> ## Documentation Index
> Fetch the complete documentation index at: https://docs.getsolum.com/llms.txt
> Use this file to discover all available pages before exploring further.
# Credentialing
> Register your NPIs and link them to locations and insurances so they appear in eligibility check dropdowns
Credentialing records store your provider NPIs, tax IDs, and linked insurances. Once a credentialing record is created, the NPI will appear in the dropdown when you run an [Eligibility Check](/guides/eligibility-check), saving you from entering it manually each time.
Manage credentialing from [**Settings → Credentialing**](https://app.getsolum.com/settings/credentialing).
***
## Quick Start
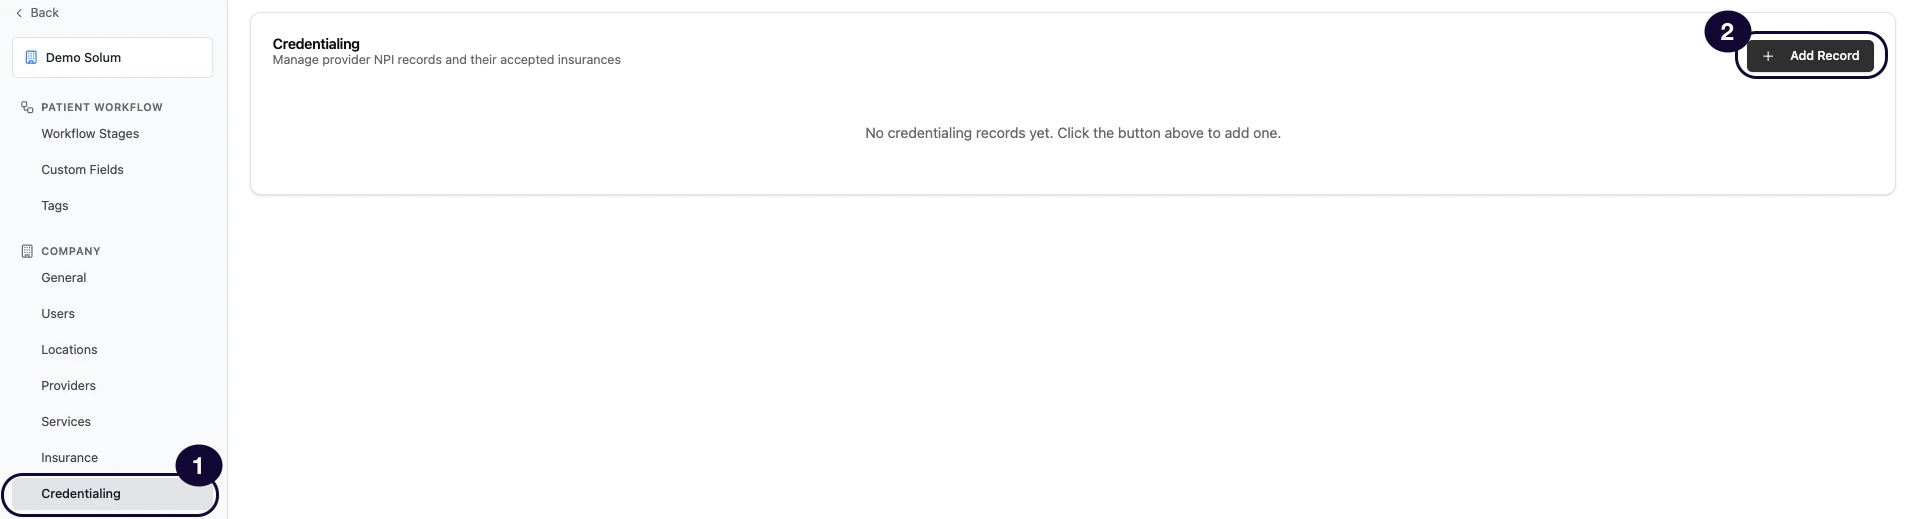
1. **Go to Settings → Credentialing** in your Solum dashboard.
2. **Click "Add Record"** to open the creation form.
3. **Fill in the basic info** — name, type, and NPI are required.
4. **Link the address** — for an organization (entity) NPI, select a location; for an individual NPI, select the provider (their locations come from the provider record).
5. **Add insurances** — link the payers this NPI is credentialed with.
6. **Click Create** — the NPI is now available in eligibility check dropdowns.
 ***
## Credentialing Fields
| Field | Required | Description |
| -------------- | -------- | ---------------------------------------------------------------------------------------------------------------------------------------------------------------------------------------------------------------------- |
| **Name** | Yes | A label for this credentialing record (e.g., your practice name or the provider's name) |
| **Type** | Yes | Choose **Entity** for a facility/organization NPI, or **Rendering Provider** for an individual provider NPI |
| **NPI** | Yes | The 10-digit National Provider Identifier |
| **Tax ID** | No | The tax identification number associated with this NPI |
| **Location** | No | Entity NPIs only. Select from the locations you have already set up in [Locations](/guides/locations) to link the location's address to the record. |
| **Provider** | No | Individual (rendering provider) NPIs only. Link the provider this NPI belongs to — the record then shows the locations set on that provider (a provider can work at several; manage them in **Settings → Providers**). |
| **Insurances** | No | The payers this NPI is credentialed with. Select from the available list. |
If you don't see a location in the dropdown, you need to create it first. See the [Locations guide](/guides/locations) for instructions.
***
## Creating a Credentialing Record
1. Go to **Settings → Credentialing**.
2. Click **Add Record**.
3. Enter a **Name** for this record.
Use a descriptive name that helps your team identify this NPI quickly, such as "Main Clinic - Entity NPI" or "Dr. Smith - Rendering".
4. Select the **Type**:
* **Entity** — Use this for your facility or organization NPI (Type 2 NPI).
* **Rendering Provider** — Use this for an individual provider NPI (Type 1 NPI).
5. Enter the **NPI** (10 digits).
6. Enter the **Tax ID** if available. This is optional.
7. Link the address: for an **Entity** NPI, select a **Location** from the dropdown — this pulls the address from the location you have already configured in **Settings → Locations**. For a **Rendering Provider** NPI, select the **Provider** instead — the record shows the locations set on that provider (**Settings → Providers**).
8. Add **Insurances** by selecting the payers this NPI is credentialed with from the list.
If you don't see an insurance payer in the list, review the [Insurance guide](/guides/insurances) for how to add payers to your account.
9. Click **Create**.
The NPI is now saved and will appear in the **Provider NPI** dropdown when running eligibility checks.
***
## Adding Multiple NPIs
You can create as many credentialing records as you need. This is common when your practice has:
* Multiple physical locations, each with their own entity NPI
* Several individual rendering providers
* Different NPIs credentialed with different insurance payers
Each record is independent, so you can configure different locations and insurance lists for each NPI.
***
## Editing a Credentialing Record
Click on any credentialing record to open it for editing. You can update the name, type, NPI, Tax ID, location, and linked insurances at any time.
***
## How Credentialing Connects to Eligibility Checks
When you run an eligibility check, the **Provider NPI** field offers a dropdown of all NPIs from your credentialing records. Selecting one automatically fills in the NPI for the check.
This means your team does not need to memorize or look up NPI numbers. They select the correct provider or location from the list, and the check runs with the right credentials.
Set up all your credentialing records before your team starts running eligibility checks. This way, every NPI is available from day one and reduces the chance of errors from manual entry.
***
## Permissions
Only **Admins** can create, edit, and delete credentialing records. Regular users can view credentialing records and use them in eligibility checks, but cannot make changes.
***
## Troubleshooting
| Problem | Fix |
| ---------------------------------------------------- | ----------------------------------------------------------------------------------------------------------------------------------------------------- |
| NPI not appearing in eligibility check dropdown | Make sure a credentialing record with that NPI has been created in **Settings → Credentialing**. |
| Location not appearing in the location dropdown | The location needs to be created first in **Settings → Locations**. See the [Locations guide](/guides/locations). |
| No Location field for an individual NPI | Expected — an individual (rendering provider) NPI takes its locations from the linked provider. Set them on the provider in **Settings → Providers**. |
| Insurance payer not appearing in the insurances list | The payer needs to be added to your account first. See the [Insurance guide](/guides/insurances). |
| Unsure whether to use Entity or Rendering Provider | Use **Entity** for your clinic/organization NPI (the one on your facility's enrollment). Use **Rendering Provider** for individual clinician NPIs. |
***
## Credentialing Fields
| Field | Required | Description |
| -------------- | -------- | ---------------------------------------------------------------------------------------------------------------------------------------------------------------------------------------------------------------------- |
| **Name** | Yes | A label for this credentialing record (e.g., your practice name or the provider's name) |
| **Type** | Yes | Choose **Entity** for a facility/organization NPI, or **Rendering Provider** for an individual provider NPI |
| **NPI** | Yes | The 10-digit National Provider Identifier |
| **Tax ID** | No | The tax identification number associated with this NPI |
| **Location** | No | Entity NPIs only. Select from the locations you have already set up in [Locations](/guides/locations) to link the location's address to the record. |
| **Provider** | No | Individual (rendering provider) NPIs only. Link the provider this NPI belongs to — the record then shows the locations set on that provider (a provider can work at several; manage them in **Settings → Providers**). |
| **Insurances** | No | The payers this NPI is credentialed with. Select from the available list. |
If you don't see a location in the dropdown, you need to create it first. See the [Locations guide](/guides/locations) for instructions.
***
## Creating a Credentialing Record
1. Go to **Settings → Credentialing**.
2. Click **Add Record**.
3. Enter a **Name** for this record.
Use a descriptive name that helps your team identify this NPI quickly, such as "Main Clinic - Entity NPI" or "Dr. Smith - Rendering".
4. Select the **Type**:
* **Entity** — Use this for your facility or organization NPI (Type 2 NPI).
* **Rendering Provider** — Use this for an individual provider NPI (Type 1 NPI).
5. Enter the **NPI** (10 digits).
6. Enter the **Tax ID** if available. This is optional.
7. Link the address: for an **Entity** NPI, select a **Location** from the dropdown — this pulls the address from the location you have already configured in **Settings → Locations**. For a **Rendering Provider** NPI, select the **Provider** instead — the record shows the locations set on that provider (**Settings → Providers**).
8. Add **Insurances** by selecting the payers this NPI is credentialed with from the list.
If you don't see an insurance payer in the list, review the [Insurance guide](/guides/insurances) for how to add payers to your account.
9. Click **Create**.
The NPI is now saved and will appear in the **Provider NPI** dropdown when running eligibility checks.
***
## Adding Multiple NPIs
You can create as many credentialing records as you need. This is common when your practice has:
* Multiple physical locations, each with their own entity NPI
* Several individual rendering providers
* Different NPIs credentialed with different insurance payers
Each record is independent, so you can configure different locations and insurance lists for each NPI.
***
## Editing a Credentialing Record
Click on any credentialing record to open it for editing. You can update the name, type, NPI, Tax ID, location, and linked insurances at any time.
***
## How Credentialing Connects to Eligibility Checks
When you run an eligibility check, the **Provider NPI** field offers a dropdown of all NPIs from your credentialing records. Selecting one automatically fills in the NPI for the check.
This means your team does not need to memorize or look up NPI numbers. They select the correct provider or location from the list, and the check runs with the right credentials.
Set up all your credentialing records before your team starts running eligibility checks. This way, every NPI is available from day one and reduces the chance of errors from manual entry.
***
## Permissions
Only **Admins** can create, edit, and delete credentialing records. Regular users can view credentialing records and use them in eligibility checks, but cannot make changes.
***
## Troubleshooting
| Problem | Fix |
| ---------------------------------------------------- | ----------------------------------------------------------------------------------------------------------------------------------------------------- |
| NPI not appearing in eligibility check dropdown | Make sure a credentialing record with that NPI has been created in **Settings → Credentialing**. |
| Location not appearing in the location dropdown | The location needs to be created first in **Settings → Locations**. See the [Locations guide](/guides/locations). |
| No Location field for an individual NPI | Expected — an individual (rendering provider) NPI takes its locations from the linked provider. Set them on the provider in **Settings → Providers**. |
| Insurance payer not appearing in the insurances list | The payer needs to be added to your account first. See the [Insurance guide](/guides/insurances). |
| Unsure whether to use Entity or Rendering Provider | Use **Entity** for your clinic/organization NPI (the one on your facility's enrollment). Use **Rendering Provider** for individual clinician NPIs. |