> ## Documentation Index
> Fetch the complete documentation index at: https://docs.getsolum.com/llms.txt
> Use this file to discover all available pages before exploring further.
# Workflow Stages
> Learn how to set up, customize, and reorder the stages that guide patients through your clinic's workflow
# Creating Workflow Stages
Workflow Stages let you define the steps a patient moves through — from first contact all the way to discharge. You can create as many stages as your clinic needs, and some stages can automatically trigger tasks like running an insurance verification when a patient is moved in.
You can find Workflow Stages under **Settings → Workflow Stages**.
To access Settings, go to the bottom left side of the platform where you’ll see your email. Click on it, and you’ll see the Settings option.
***
## Step by Step
1. Go to **Settings → Workflow Stages**.
2. Click **Add Stage**
 3. Enter a **Stage Title**, an optional **Description**, and select a **Stage Type**.\
**Stage Title:** The name that appears on the workflow board, visible to your whole team **Despcription:** A short note explaining what this stage is for and what type of patients belong here — helpful for new team members **Stage Type:** Controls whether any automatic tasks are triggered when a patient enters this stage
4. Click **Save**.
5. To reorder stages, click and hold the **grid handle icon** (⠿) next to a stage, then drag it to the new position.
You can create as many stages as your clinic needs. There is no limit.
***
### Reordering Stages
Your stages appear on the workflow board in the order they're listed here. You can change that order at any time.
1. Find the stage you want to move.
2. Click and hold the **grid handle icon** (⠿) on the left side of the stage card.
3. Drag the stage up or down to the position you want.
4. Release to drop it in place.
3. Enter a **Stage Title**, an optional **Description**, and select a **Stage Type**.\
**Stage Title:** The name that appears on the workflow board, visible to your whole team **Despcription:** A short note explaining what this stage is for and what type of patients belong here — helpful for new team members **Stage Type:** Controls whether any automatic tasks are triggered when a patient enters this stage
4. Click **Save**.
5. To reorder stages, click and hold the **grid handle icon** (⠿) next to a stage, then drag it to the new position.
You can create as many stages as your clinic needs. There is no limit.
***
### Reordering Stages
Your stages appear on the workflow board in the order they're listed here. You can change that order at any time.
1. Find the stage you want to move.
2. Click and hold the **grid handle icon** (⠿) on the left side of the stage card.
3. Drag the stage up or down to the position you want.
4. Release to drop it in place.
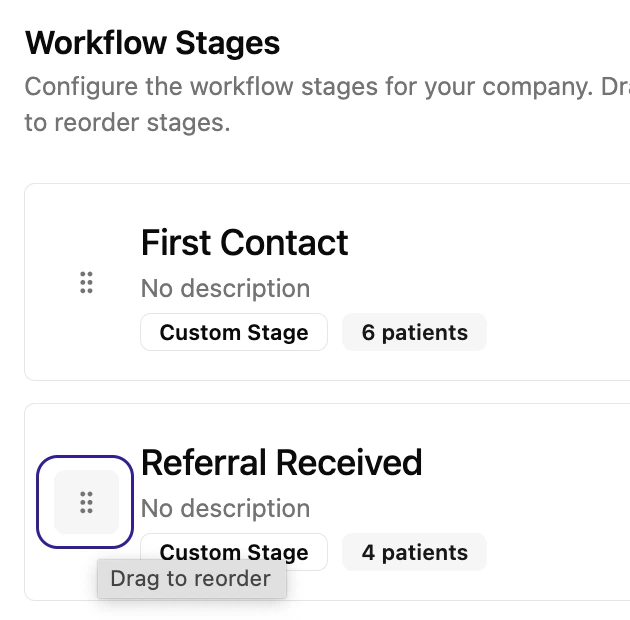 \
*The grid handle icon (⠿) on the left side of a stage card — click and hold it to drag the stage to a new position*
The order you set here is the order your team will see stages on the workflow board. Arrange them to match how patients actually move through your clinic.
***
## Troubleshooting
| Problem | Fix |
| --------------------------------------------- | ------------------------------------------------------------------------------------------------------------------------- |
| A stage is not triggering a VOB automatically | Check that the **Stage Type** is set to **Insurance Verification** — a Custom Stage type does not trigger automatic tasks |
| I can't drag a stage to reorder it | Make sure you are clicking and holding the **grid handle icon** (⠿), not the stage title or description |
***
\
*The grid handle icon (⠿) on the left side of a stage card — click and hold it to drag the stage to a new position*
The order you set here is the order your team will see stages on the workflow board. Arrange them to match how patients actually move through your clinic.
***
## Troubleshooting
| Problem | Fix |
| --------------------------------------------- | ------------------------------------------------------------------------------------------------------------------------- |
| A stage is not triggering a VOB automatically | Check that the **Stage Type** is set to **Insurance Verification** — a Custom Stage type does not trigger automatic tasks |
| I can't drag a stage to reorder it | Make sure you are clicking and holding the **grid handle icon** (⠿), not the stage title or description |
***